Wednesday, June 30, 2010

Install WINDOWS XP Under UBUNTU

Step 1. Install Virtual Box

  • apt-get install virtualbox

Step 2. Run Create new Virtual machine.

  • Run Virtual box.

  • Click New.

virtualboxos01.png

  • Press Next.

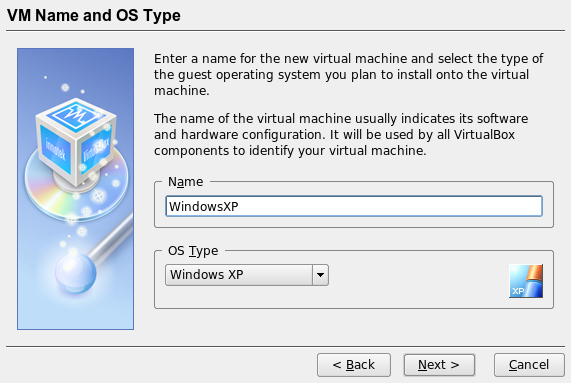
  • Fill Name, for example ‘WindowsXP’ and select OS type ‘Windows XP’ and click ‘Next’ button.

virtualboxos02.png

  • Set your memory. I have 1 GB memory, so I give 256MB for Windows XP. It’s basic need for Windows XP to run smoothly. Then click ‘Next’ button.

virtualboxos03.png

  • Click ‘New’ to create a new virtual hard disk or ‘Existing’ if you have a virtual hard disk already.

virtualboxos06.png

virtualboxos05.png

  • Click ‘Next’ button. There 2 types Image type. I recommend you to use ‘Fixed-size-image’. I’ve tried both images. Dynamically expanding image need less space at the beginning and flexible BUT it will reduce your Windows XP speed a lot even with a small application.

virtualboxos07.png

  • Click ‘Next’ button. If you use Windows XP for running few applications, I suggest to use 5 GB. If you use a lot of applications to run on XP, dual boot is better options.

virtualboxos08.png

  • Click ‘Next’ button.

  • And click ‘Finish’ button. Virtual box will create 5 GB virtual drive in your hard disk space.

virtualboxos09.png

  • Click ‘Next’ button to continue.

  • Finally, click ‘Finish’ button. The location of your virtual drive is at /home/your_username/.VirtualBox/VDI.

virtualboxos10.png

If you are success then you will get the same screen like me.

virtualboxos11.png

Step 3. Setting your Virtual drive.

Before we go to step no. 3, I suggest to create a new directory for your shared folder. In this sample I named ‘VirtualBox_Shareddirectory‘.

Now, we go to step no. . In this step, you will mount all your device to your virtual drive.

First, select your virtual drive and click ‘Settings‘.

  • Choose CD/DVD ROM and mark ‘Mount CD/DVD drive‘ then select your CD/DVD drive. Don’t OK button yet.

virtualboxos12.png

  • Go to ‘Audio’ and click ‘Enable Audio’. Select your audio driver.

virtualboxos13.png

  • Goto to ‘Serial Ports‘ and click ‘Enable Serial Port’.

virtualboxos14.png

  • Goto to ‘Shared Folder‘. Click a folder icon (picture folder with green plus sign). Goto folder ‘VirtualBox_shareddirectory’ that we’ve created before. Click OK button to finish the process.

virtualboxos15.png

Now, we are ready to start the installation process for Windows XP.

Put the Windows XP CD installer into your CDROM. Cancel any messages from Windows XP installation disc.

To start the installation process, click ‘start‘.

Just follow all installation process until completely done.

virtualboxos16.png

My windows XP in Gutsy + ZuneDesktopTheme.

virtualboxos17.png

Tuesday, June 29, 2010

DOWNLOAD & INSTALL Ubuntu 10.04 lucid lynx

Acquiring Ubuntu

There are many ways to get an Ubuntu installation disk, these are detailed on the GettingUbuntu page. If you are planning on downloading and burning your own installation disk, please refer to BurningIsoHowto.

To acquire Ubuntu, you can order a free CD from Canonical or purchase a CD or DVD from a distributer You can also download and burn the image to a CD or DVD. You can download the Ubuntu installer from Canonical. Downloading the installer requires a blank CD or DVD, and a CD or DVD burner that is capable of burning disc images.

To download Ubuntu Desktop Edition:

  1. Using your web browser, navigate to http://www.ubuntu.com/getubuntu/download

  2. Select the architecture of your processor (32 or 64 bit).
  3. Click "Start download". A pop up window opens, prompting you where to run or save the file.
  4. In Internet Explorer, click Run to automatically open the installation file in a CD burning utility or click Save to save the file to your disk. In Mozilla Firefox, select Open with to open the installation file in a CD burning utility or select Save File to save the file to your disk.

After downloading the Ubuntu installation CD image, you need to burn it to a CD or DVD. See BurningIsoHowto for detailed instructions on burning ISO disk images.

To burn the installation disk to a CD or DVD:

  1. Place a recordable CD or DVD into your CD/DVD drive.
  2. Load an application that is capable of burning .ISO image files to CDs or DVDs.
  3. Using your CD and DVD writing program, copy the disk image to your blank CD or DVD.

To Install Ubuntu

Ubuntu can be installed with the graphical CD. Make sure that your computer is set to boot from a CD before a hard drive.

  1. Insert the Ubuntu disc into your CD drive.
  2. Start or restart your computer. The Language screen appears. If you reboot your computer and do not see the language selection screen (seen below without the option to try without installing), please refer to BootFromCD.

    install-step1.png

  3. Select your desired language and click Install Ubuntu 10.04 LTS. The Where are you? window appears.

    install-step2.png

  4. Select the location closest to your location and click Forward. The Keyboard layout window appears.

    install-step3.png

  5. If the Suggested option is not correct, select the correct keyboard layout. Click Forward. The Prepare disk space window appears.

    install-step4b.png

  6. If you want to install Ubuntu over your entire hard drive, then Select Guided – use entire disk and select the hard drive that you want to install Ubuntu.

    install-step4a.png

    Click Forward.

WARNING: Installing Ubuntu on your entire hard disk will erase all data that is currently on the drive.

OR

  1. If you want to install Ubuntu on a single partition Dual Booting, Select Guided – resize. In the New partition size area, drag the area between the two partitions to create your desired partition sizes. Click Forward.

    install-step4b.png

  2. The Who are you? window appears.

    install-step5.png

  3. Enter the requested information, and click Forward. The Ready to install window appears.

    install-step6.png

  4. Verify that the language, layout, location, and personal information are correct and click Install. The installation wizard begins.

    install-step7.png

  5. When the installation wizard finishes, the Installation complete window appears.

    install-step8.png

    Click Restart now to restart your computer. Ubuntu is now installed.

8 things to do after installing Ubuntu 10.04 Lucid

1. Run Update Manager

Just because you’ve installed the latest version of Ubuntu doesn’t mean that there won't be some updates and patches waiting for you. Make sure you run the update manager (if it doesn’t update you first) so that you’re benefitting from the latest fixes and features.

2. Enable graphics card drivers for 3D fun

If you want to use advanced desktop effects such as Compiz (3d Cube, wobbly windows) then you will need to enable the “official” drivers for your graphics card.

Ubuntu should automatically detect and alert you that 3D drivers are available. If so, you will see a ‘circuit board’ icon appear on the top panel. Click this and follow the prompts.

If Ubuntu fails to detect any hardware (do be patient as this isn’t always instant) then you can manually run the hardware configuration tool yourself from the System > Preferences menu.

3. Enable playback of MP3’s, MP4’s & more

It’s a shame this step has to be included at all but sadly Ubuntu aren’t allowed by law to ship certain multimedia codec's out of the box. Installing them yourself, thankfully, is a breeze – just click the button below!image

4. Install more themes

Want a bigger selection of themes to choose between? You’ll find many beautiful and stylish ones in the Community Themes package.
image

5. Change font and/or font size

I know what you’re thinking: those fonts look huge, huh? Set them to a smaller size via the Appearance menu (Shortcut: Right click on Desktop > Change Background > Fonts).

Most readers find size 9pt works well but if you have a very wide display 8pt may suit you better.
If the default font isn’t to your taste a lot of readers suggested installing DroidSans.imageMany users also recommend you install the Microsoft Core fonts package for better web browsing:
image

6. Set up UbuntuOne file sync

If you don’t already use UbuntuOne now is the perfect time to do so. You'll get 2 GB of free storage, you are able to sync your Firefox bookmarks, Tomboy notes and Evolution contacts between computers – as well as any file or folder you wish.

Head to Applications > Internet > UbuntuOne to get started.

7. Install Ubuntu Tweak and make your life easier

Ubuntu Tweak is a one-stop shop for managing and installing extra applications, tweaking your desktop (such as putting the window controls back on the right and choosing which icons show on the desktop) and allowing you to keep your system in tip-top shape with the built in system cleaning options. (Ubuntu tweak recently won our ‘Best System Cleaners’ poll by a landslide – and for good reason!)
image

8. Visit the Software Centre to find great apps

One size certainly does not fit all so if you’re wanting to add VLC, install Photoshop rival The GIMP or play some awesome games then look no further than the Ubuntu Software Centre which can be launched from the Applications menu.

Everything is one-click install so browse around – make sure you check out the featured applications section, too!


About UBUNTU

Ubuntu is, in my humble opinion the easiest and best way to switch from Windows to a free/open-source operating system. In order to make your transition easier, and to help those that have started using ubuntu, this weblog features a series of articles with tips and tricks.